第四课 计算图的构建
拓扑排序
对于一个有向无环图,拓扑排序总能够找到一个 节点序列,在这个序列中,每个节点的前驱节点都能排在这个节点的前面。什么是 前驱节点 呢,也就是对于 有向图中任意一条边的起点,我们可以认为它是 终点节点 的前驱节点。
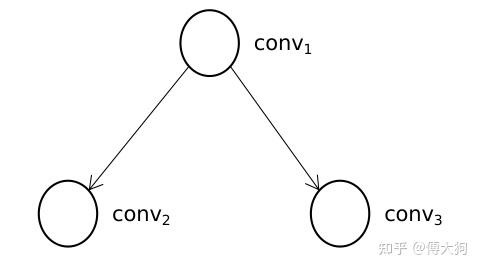
对于上图例子中的深度学习模型,conv1 是 conv2 的前驱节点,conv1 也是 conv3 的前驱节点,所以在计算执行节点序列时,conv1 必须出现在 conv2 和 conv3 的前面,而 conv2 和 conv3 之间的顺序因为没有节点之间的连接而不做要求。因此执行节点顺序有以下两种:
- conv1-> conv2-> conv3
- conv1-> conv3-> conv2
基于深度优先的拓扑排序计算步骤
有计算排序的函数为 ReverseTopo. ReverseTopo 有参数 current_op.
- 选定一个入度为零的节点(
current_op),入度为零指的是 该节点没有前驱节点或所有前驱节点已经都被执行过,在选定的同时将该节点的已执行标记置为True,并将该节点传入到ReverseTopo函数中; - 遍历 1 步骤中节点的 后继节点(
current_op->output_operators); - 如果 1 的某个后继节点没有被执行过(已执行标记为
False),则 递归 将 该后继节点 传入到ReverseTopo函数中; - 第 2 步中的遍历结束后,我们将当前节点放入到执行队列(
topo_operators_)中。
当该函数结束后,我们对 执行队列 中的排序结果做逆序就得到了最终拓扑排序的结果,我们来看看具体的代码:
1 | void RuntimeGraph::ReverseTopo( |
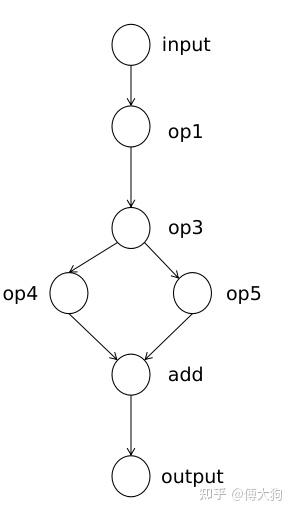
一个复杂点的例子

对于上图的这个例子,input 节点是其中唯一的输入节点,output 节点是其中唯一的输出节点,其他都是 计算节点(RuntieOperator),表示深度学习模型中的一个算子。我们下面就对这个模型进行拓扑排序来求得它正确的执行顺序。要注意的是,拓扑排序可以有多种结果的序列,不同种序列之间的顺序也可能不完全相同,但是不同种序列均不会影响模型最终的预测输出。
我们对上图的深度学习模型进行手工计算,计算步骤符合上一小节中的代码 ReverseTopo 函数。
- 首选,传入到
ReverseTopo函数中的是input节点; - 对
input节点进行遍历,input节点的后继节点中没有执行过的只有op1,所以我们 以递归的方式 将op1传入到ReverseTopo函数中; - 对
op1节点进行遍历,op1有后继节点为op3没有被访问过,所以我们以递归的形式将op3传入到ReverseTopo函数中; - 对
op3节点进行遍历,分别有后继节点op4和op5,均没有被访问过,所以我们都以递归的形式将op4传入到ReverseTopo函数当中; - 因为
op4没有后继节点,会跳出for (const auto& [_, op] : next_ops)循环,所以会将本节点放入到执行队列中(op4)。随后该栈函数返回,返回到 4 步中以递归的形式将op5传入到ReverseTopo函数中; op5的后继节点进行遍历,后继节点为output节点,output没有被访问过,所以再以递归的形式将op5传入到Reversetopo函数中。- 最后由于
output节点没有后继节点,我们将output节点 放入到执行队列中(op4,output)。随后,该栈函数返回,返回到 6 中,因为op5的后继节点已经都被访问过,所以将op5放入到执行队列中(op4,output,op5)。 - 从 6 再返回到 4 中,因为
op3的所有后继都已经被访问过,所以将op3放入到执行队列中(op4,output,op5,op3). - 从 4 返回到 3 中,因为
op1的后继节点已经都被访问过,所以将op1放入到执行队列中(op4,output,op5,op3,op1). - 从 3 返回到 2 中,将
input节点 放入到执行队列中,有(op4,output,op5,op3,op1,input). - 最后需要对执行队列来一个逆序并得到最后的结果:(
input,op1,op3,op5,output,op4).
模型的 Build(构建)
我们在上小节中看到了 model.build 的调用,所以我们将在这一节中对 build 函数做一个补充调用。
模型的状态
RuntimeGraph 共有三个状态,表示 不同状态下的同一个模型(待初始化、待构建和构建完成),分别如下:
1 | enum class GraphState { |
在 RuntimeGraph 类中有一个变量会记录此刻模型的状态:
1 | GraphState graph_state_ = GraphState::NeedInit; |
三者的状态变换如下,依次表示待初始化,待构建和模型构建完成。
1 | NeedInit --> NeedBuild --> Complete |
在初始情况下 模型的状态 graph_state_ 为 NeedInit,表示模型目前 待初始化。因此我们不能在此刻直接调用 Build 函数中的功能,而是需要在此之前先调用模型的 Init 函数,这一过程在下方的代码中也有体现,在初始化函数(Init)调用成功后会将模型的状态调整为 NeedBuild.
1 | void RuntimeGraph::Build(const std::string& input_name, |
以上构建(Build)函数中代码的目的是为了检查模型是否已经构建完成。也就是检查 graph_state_ == GraphState::Complete. 如果是这样的话,表示模型已经构建完成,Build 函数直接返回。如果模型此刻的状态是 NeedInit, 那我们首先 需要先对这个模型进行初始化(先调用 Init 函数),再进行构建。
我们再来看一下在 Init 函数在本节课中新增加的状态转换,可以看到在 Init 函数的最后,我们将模型的状态从 NeedInit 调整到 NeedBuild(需要被构建),所以从 Init 函数返回之后,Build 函数便可以继续执行其中的代码。
1 | bool RuntimeGraph::Init() { |
继续构建图关系
1 | void RuntimeGraph::Build(const std::string& input_name, |
我们继续往下看 Build 函数中的内容,这段代码主要用于 构建算子之间的联系。例如对于以下的深度学习模型结构,我们需要使用最外层的 for 循环遍历模型中的每一个算子 current_op.
随后我们程序会拿到每个算子中的 output_names,例如对于 op3 来说,它的 output_names 包括了 op4 和 op5.
我们会对该算子(op3)的 output_names 进行遍历,并会根据 output_name 找到对应的后继算子并插入到 op3 的 output_operators 中。例如对于 op3 算子,我们会根据 output_names 中的 "op4" 和 "op5" 来寻找它的两个后继节点,寻找到后放入到当前计算节点 current_op 的后继节点列表 output_operators 中。
当最外层的循环结束时,op1 中的 output_operators 中存放了 它的一个后继节点 {"op3":op3}, 而 op3 中的 output_operators 会存放 它的两个后继节点 {"op4":op4, "op5":op5}. 以此类推。不难看出,output_operators 中存放的是该节点所有后继算子节点的 name 到后继算子本身的映射。
节点输出张量的初始化
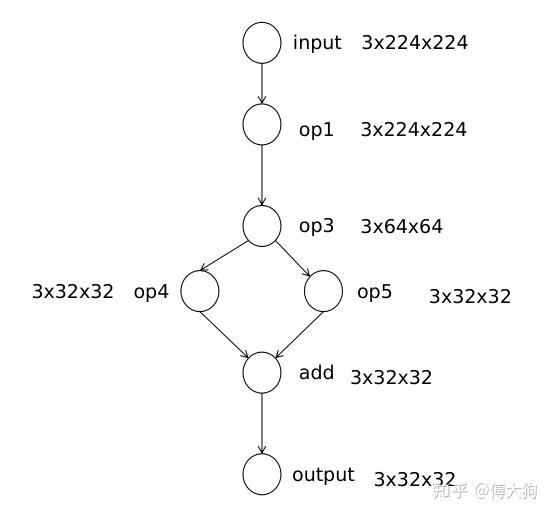
我们在 Build 函数中还需要 完成计算节点中输出 张量空间 的初始化,从下图中可以看出每个节点都有一个形状不同的输出张量,用来存放该节点的计算输出。那我们为什么要在构建(Build)阶段就初始化这些数据,而不是在算子计算的时候再对输出空间初始化呢?这是因为 申请较大字节数的内存空间也需要一定的时间,如果放在构建阶段进行提前申请可以在【运行时】省下这段时间。
另外,我们需要对算子的 输出空间 做初始化和提前申请,那么我们需要对一个算子的 输入空间初始化 吗?其实是不用的,我们借用下方的这张图,节点旁的维度表示该节点输出维度大小。
在 op1 节点中我们需要申请 3 x 224 x 224 大小的输出空间,对于它的后继节点 op3,我们需要申请 3 x 64 x 64 的内存作为输出空间,而 op3 的输入空间和 op1 的输出空间大小相同,所以 op3 的输入空间可以复用前驱节点(op3)中的输出张量空间。 同理对于 add 节点,我们需要为它申请 3 x 32 x 32 大小的输出空间,但是对于 add 节点的两个输入,我们可以复用前驱节点 op4 和 op5 中的输出。
以上的张量空间预分配的叙述过程对应有以下的代码:
1 | void RuntimeOperatorUtils::InitOperatorOutput( |
我们为 RuntimeOperator 初始化空间时,还是需要用到 PNNX 中的 Operator 结构,所以我们首先 需要判断两个数组是否是等长的,它们具有一一对应的关系。
1 | void RuntimeOperatorUtils::InitOperatorOutput(...){ |
在以上的代码中,我们首先使用 pnnx_operators.at(i)->outputs 获得第 i 个计算节点中的所有输出计算数 operand, 我们需要根据这个 pnnx 计算数 Operand 中记录的 Shape 和 Type 信息来初始化我们 runtime_op 中输出 数据存储 的空间 output_tensors = runtime_op->output_operands.
换句话说,我们就是要根据 pnnx::operand 中记录的输出节点大小(operand->shape)来 初始化该计算节点的输出张量 output_tensors = runtime_op->output_operands 也就是 计算节点中的具体存储空间,以及输出张量中的其他变量。
1 | const int32_t batch = operand_shapes.at(0); |
从上文知道,我们需要根据计算数的形状 operand_shapes = operand->shape 来初始化该计算节点的输出张量 output_tensors 中的存储空间,但是我们输出张量的维度只支持二维的、三维以及四维的,所以需要在以上代码上做 check.
1 | if (!output_tensors) { |
如果输出张量 output_tensors 没有被初始化,我们首先需要根据 pnnx 中的信息来 初始化一个保存输出张量的结构(output_operand), 在这个结构中需要 保存输出张量相关的类型、名字以及维度信息。该结构的具体定义,我们已经在第二节中讲述过了,不清楚的同学可以去翻翻那节课的视频和代码。
1 | struct RuntimeOperand { |
在上面的代码中,我们已经初始化了 RuntimeOperand 结构中的名字、类型和维度等信息。下面我们要去初始化结构中 存放输出数据的 datas 变量,它是一个张量的数组类型,数组的长度等于该计算节点的 batch_size 大小。
1 | for (int j = 0; j < batch; ++j) { |
对于一个计算算子 runtime_op 来说,它的输出张量数组的长度等于 batch_size 个,所以我们在循环中需要对 batch_size 个输出张量进行创建(创建的时候需要依据 operand_shapes, 从 pnnx::operand 中得到的维度)。
在创建完成后还需要放入到 output_operand 的 datas 变量中。在循环后结束后,我们会将初始化好的 output_operands 绑定到对应的计算节点中用于保存计算节点的输出数据。 至此,我们完成了计算节点中输出张量的初始化。
若没有本文 Issue,您可以使用 Comment 模版新建。